Guide to Install Our Laravel on VPS
This guide will help you install our Laravel on VPS. You can use this guide to install our Laravel on VPS. If you have any questions, please contact our support team. With this tutorial, you can install Botivus to any type of blank or empty ubuntu server. For example, Digital Ocean Droplets, Amazon Lightsail, AWS, Google Cloud Virtual Private Server, Azure Ubuntu Virtual Private Server , etc. Please follow the documentation, and it'll make the installation process relatively easy.
Prerequisites
Before you start, make sure you have the following installed on your VPS:
- Server with php version 8.2 or higher
- all extensions are enabled
- Server ram at least 1GB or higher recommended 2GB
- Server disk at least 2GB or higher recommended 4GB
Installation Process
Step 1: Access VPS At first
you need to access your VPS. You can use SSH to access your VPS. If you don't have SSH, you can use any other method to access your VPS. You can use ssh to access your VPS via Putty if you are windows user or use terminal if you are linux user.
ssh username@ipaddress
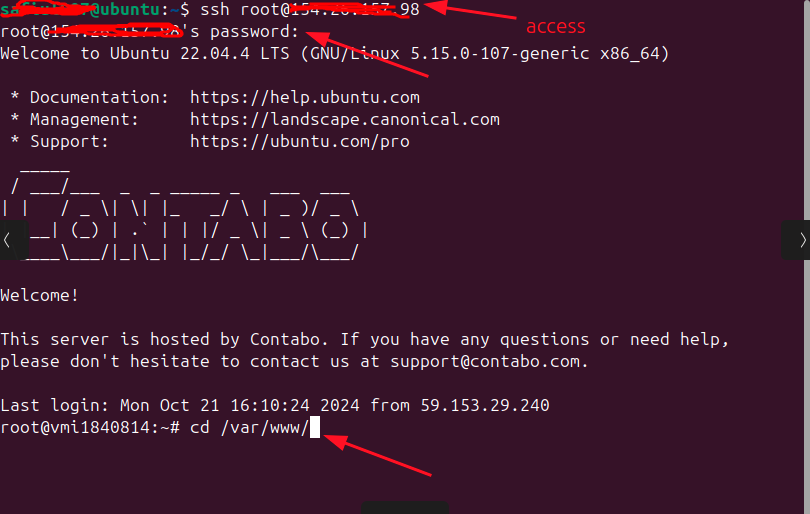
then enter your password.
Step 2: Install NodeJS & Required Application
- Install Node.js using the package manager for your Linux distribution. For example, on Ubuntu, you can install Node.js using the following command:
sudo apt-get update
sudo apt install curl
curl -sL https://deb.nodesource.com/setup_22.x | sudo -E bash -
sudo apt-get install -y nodejs
sudo apt update
- Verify that Node.js is installed by running the following command:
node --version
- Install Zip & Unzip
sudo apt-get install zip unzip
Step 3: Setup Server
Nginx is one of the most popular web servers in the world. In this deployment tutorial, we're going to use Nginx to host our website. In this tutorial, we're going to use ubuntu 20.04 to host our website.
Step 3.1: Install Nginx
- Install Nginx using the package manager for your Linux distribution. For example, on Ubuntu, you can install Nginx using the following command:
sudo apt update
- Install Nginx using the package manager for your Linux distribution. For example, on Ubuntu, you can install Nginx using the following command:
sudo apt install nginx
- Verify that Nginx is installed by running the following command:
nginx -v
- Start Nginx by running the following command:
sudo systemctl start nginx
Step 3.2: Add PPA to get the specific php version
sudo add-apt-repository ppa:ondrej/php
sudo apt update
Step 3.3: Adjusting the Firewall
Before testing Nginx, the firewall software needs to be adjusted to allow access to the service. Nginx registers itself as a service with ufw upon installation, making it straightforward to allow Nginx access. To check the ufw list, use this command,
sudo ufw status
sudo ufw app list
You will get a listing of an application list like this,
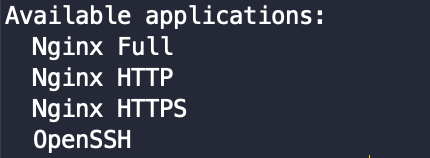
At first, add ssh to the firewall,
sudo ufw allow ssh
sudo ufw allow OpenSSH
After that, to enable Nginx on the firewall, use this command,
sudo ufw allow 'Nginx Full'
Now enable the firewall,
sudo ufw enable
sudo ufw default deny
You can verify the change by typing:
sudo ufw status
Step 4: Install MySQL
- Install MySQL using the package manager for your Linux distribution. For example, on Ubuntu, you can install MySQL using the following command:
sudo apt-get install mysql-server
- Start the MySQL service by running the following command:
sudo systemctl start mysql
- Verify the installation by running the following command:
mysql --version
- Secure your MySQL installation by running the following command:
sudo mysql_secure_installation
- Follow the on-screen instructions to secure your MySQL installation.
Step 5: Install PHP
Install PHP and the required PHP extensions using the package manager for your Linux distribution. For example, on Ubuntu, you can install PHP using the following command:
sudo apt install php8.3 php8.3-curl php8.3-fileinfo php8.3-gd php8.3-bcmath php8.3-gettext php8.3-mbstring php8.3-bcmath php8.3-exif php8.3-mysqli php8.3-pdo php8.3-zip -y
Step 6: Install Composer
php -r "copy('https://getcomposer.org/installer', 'composer-setup.php');"
php -r "if (hash_file('sha384', 'composer-setup.php') ===
'e21205b207c3ff031906575712edab6f13eb0b361f2085f1f1237b7126d785e826a450292b6cfd1d
64d92e6563bbde02') { echo 'Installer verified'; } else { echo 'Installer
corrupt'; unlink('composer-setup.php'); } echo PHP_EOL;"
php composer-setup.php
php -r "unlink('composer-setup.php');"
sudo mv composer.phar /usr/bin/composer
Or
sudo apt-get install composer
Step 7: Create MySQL Database & User
mysql -u root -p

CREATE DATABASE botivus;

CREATE USER 'botivus'@'localhost' IDENTIFIED BY 'botivus';

GRANT ALL PRIVILEGES ON botivus.* TO 'botivus'@'localhost';

FLUSH PRIVILEGES;

exit
Note: This mysql credentials you need to save for GUI Admin Installer to work.
Step 8: Change permission for the www folder
cd  /var/www
sudo chown -R $USER:$USER /var/www
Step 9: Upload the Files
At first, use this command to create a directory on /var/www/
sudo mkdir /var/www/botivus
Now upload the files to the directory,
Then, go to your local computer
- Extract the botivus package that you download from CodeCanyon.
- On that folder, you'll get another folder called Core .
Now upload this Core folder to the server /var/www/botivus/
scp -r core/* root@server:/var/www/botivus
Step 10: Setting Up Server & Project
In this section, we'll set up our server and also will set up Reverse Proxy to host all of our sites from the same server.
At first, we'll disable the default configuration of Nginx,
sudo rm /etc/nginx/sites-enabled/default
Now, we'll create a new configuration file,
sudo touch /etc/nginx/sites-available/botivus.conf
sudo nano /etc/nginx/sites-available/botivus.conf
Add this Nginx config file to that edited file,
server {
    listen 80;
    server_name YOUR_DOMAIN.com www.YOUR_DOMAIN.com;

    add_header X-Frame-Options "SAMEORIGIN";
    add_header X-XSS-Protection "1; mode=block";
    add_header X-Content-Type-Options "nosniff";

    index index.html index.htm index.php;
    charset utf-8;

    root /var/www/botivus/public;

    location / {
        try_files $uri $uri/ @rewrite;
    }

    location @rewrite {
        rewrite ^/(.*)$ /index.php?$1 last;
    }

    location ~ \.php$ {
        include fastcgi_params;
        fastcgi_param SCRIPT_FILENAME $document_root$fastcgi_script_name;
        fastcgi_pass unix:/run/php/php8.3-fpm.sock;
        fastcgi_index index.php;
    }

    error_page 404 /index.php;

    location ~ /\.(?!well-known).* {
        deny all;
    }
}
server {
    listen 443 ssl;
    server_name YOUR_DOMAIN.com www.YOUR_DOMAIN.com;
    index index.php index.html;

    root /var/www/botivus/public;

    error_log  /var/log/nginx/error.log;
    access_log /var/log/nginx/access.log;

    ssl_certificate     /etc/nginx/conf.d/ssl/self-signed.crt;
    ssl_certificate_key /etc/nginx/conf.d/ssl/self-signed.key;

    location / {
        try_files $uri $uri/ /index.php?$query_string;
        gzip_static on;
    }

    location ~ \.php$ {
        try_files $uri =404;
        fastcgi_split_path_info ^(.+\.php)(/.+)$;
        fastcgi_pass nix:/run/php/php8.3-fpm.sock;
        fastcgi_index index.php;
        include fastcgi_params;
        fastcgi_param SCRIPT_FILENAME $document_root$fastcgi_script_name;
        fastcgi_param PATH_INFO $fastcgi_path_info;
    }
}
Make sure you change YOUR_DOMAIN.com to your specific domain name You can change admin path, if you want to change the the domain path for the laravel application Save and close the file by typing CTRL and X, then Y and ENTER when you are finished.
Then enable the config
sudo ln -s /etc/nginx/sites-available/botivus.conf /etc/nginx/sites-enabled/botivus.conf
Make sure you didn’t introduce any syntax errors by typing:
sudo nginx -t
Now, restart the Nginx service,
sudo systemctl restart nginx
Step 11: Secure Server
sudo apt install certbot python3-certbot-nginx
sudo certbot --nginx -d YOUR_DOMAIN.com
sudo ufw status
sudo ufw allow 'Nginx Full'
sudo ufw delete allow 'Nginx HTTP'
sudo ufw status
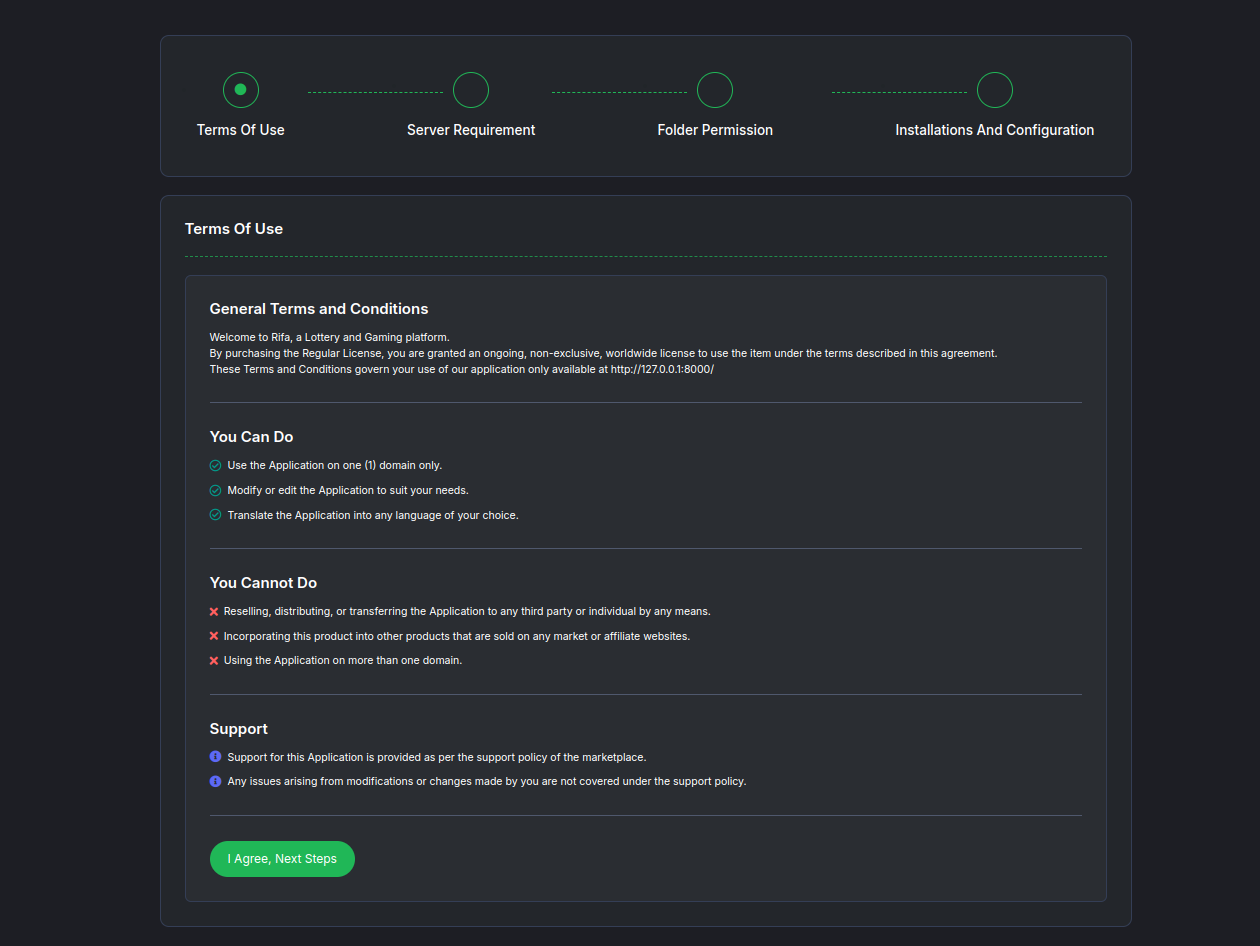
Step 12: Graphical User Interface (GUI) Installation
- Now access you domain name on your browser, then you can see the graphical user interface for the installation.
-
Agree with the terms and conditions and click "I Agree, Next Step" button.
-
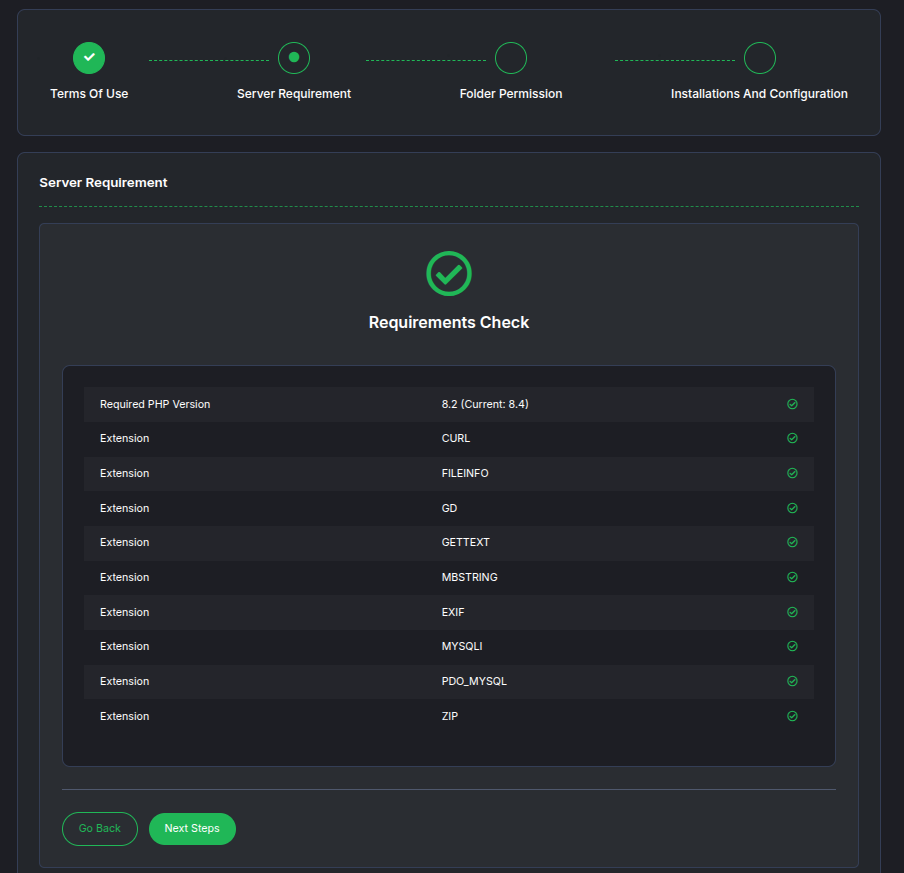
Now you can see the server requirements. If all the requirements are met then click "Next Step" button.
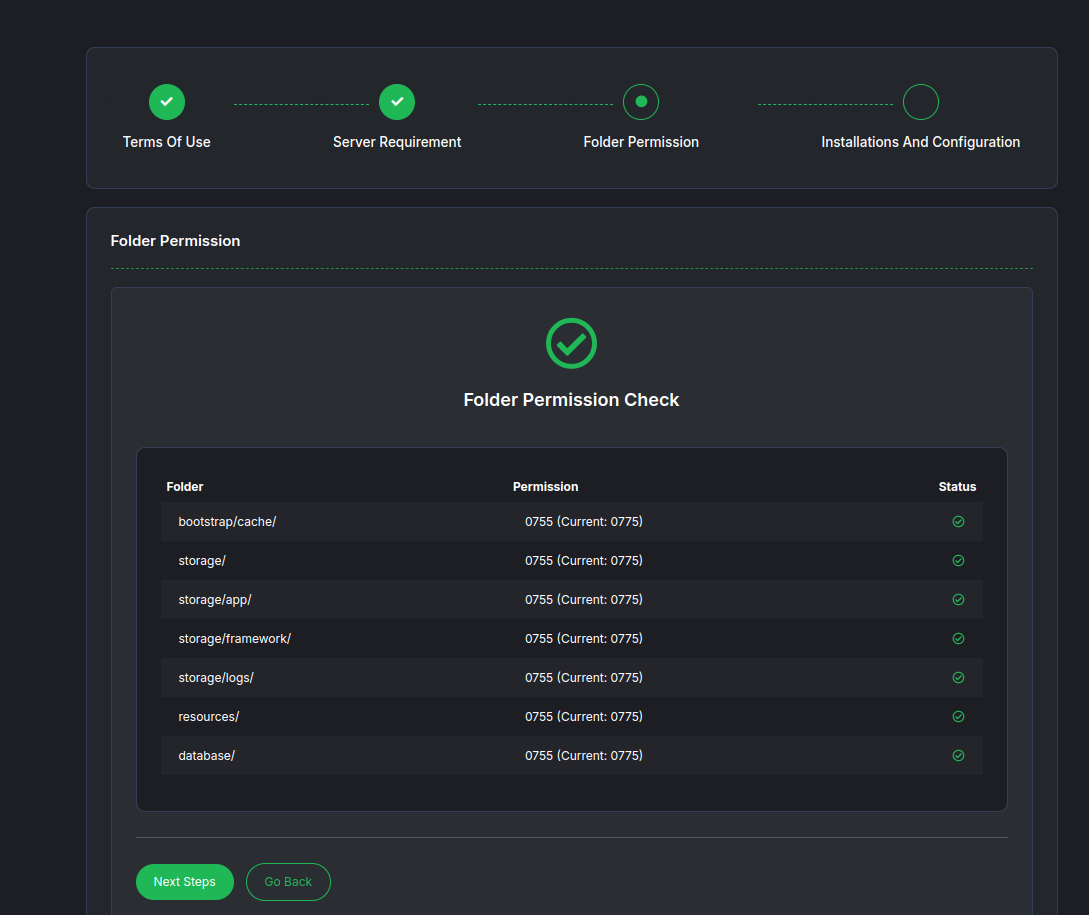
- Now check all the required folder permissions is met then click "Next Step" button.
-
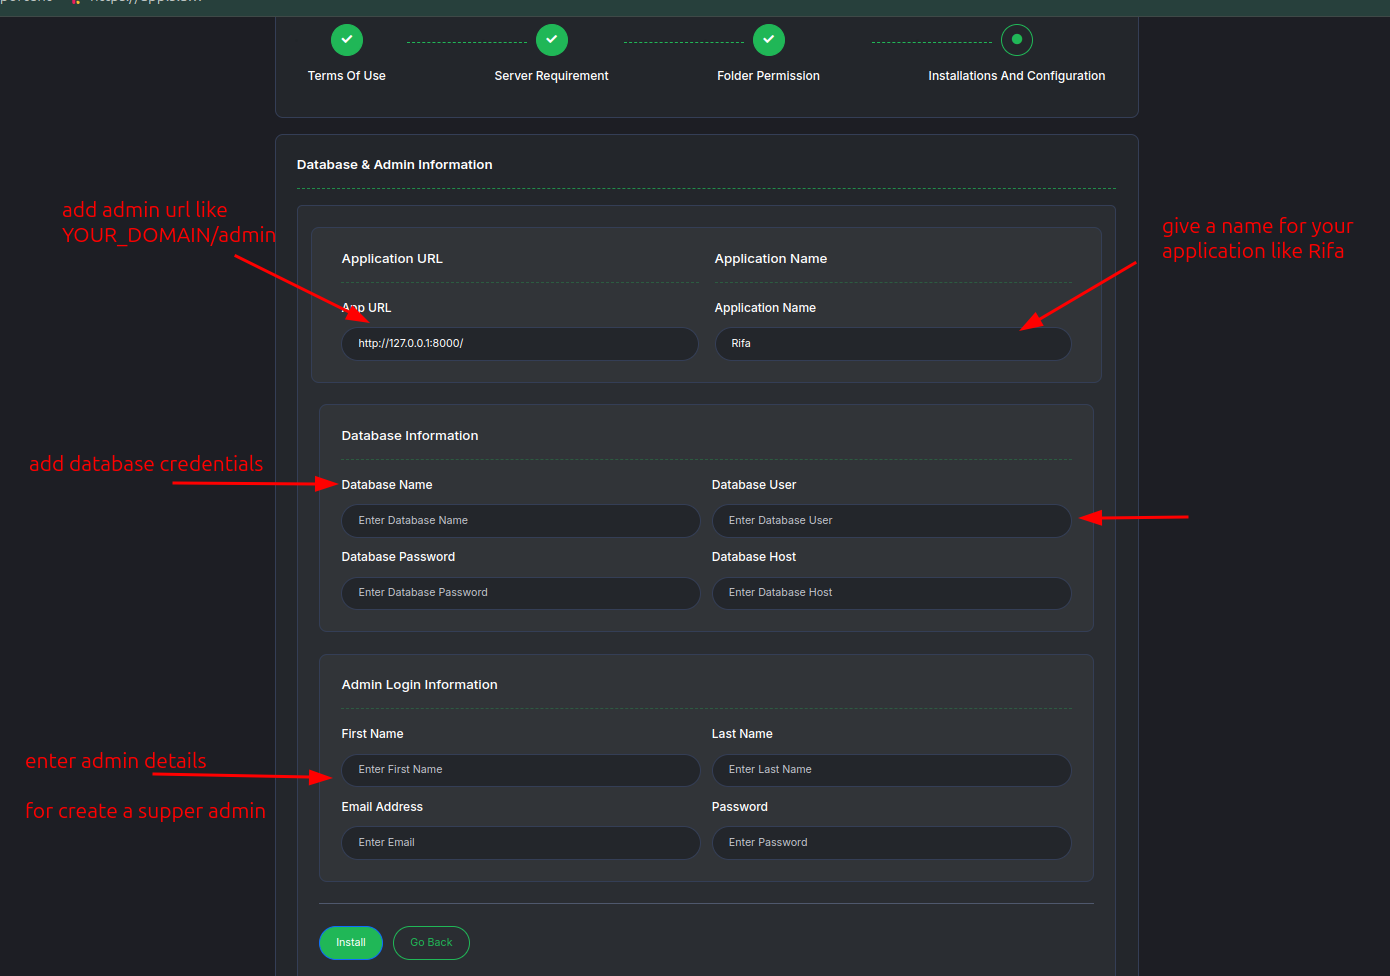
You see the configuration page and fill the required information.
- Application URL: http://yourdomain.com
- Application Name: Botivus
Database Information
- Database Name: Ex: botivus
- Database Username: ex: botivus
- Database Password: ex: botivus
- Database Host: localhost
Admin Information
- Admin First Name: ex: admin
- Admin Last Name: ex: admin
- Admin Email: ex: admin@gmail.com
- Admin Password: ex: 12345678
-
Now hit "Install" button.
- Now you will see the installation is completed. You can now access your Botivus on your domain name.
Step 13: Queue and Cron Job setup to this vps
To run the cron job, you need to add a cron job with the following command:
Step 1: install supervisor
sudo apt update
sudo apt install supervisor
Step 2: now create supervisor config file
sudo nano /etc/supervisor/conf.d/laravel-worker.conf
Step 3: Add the following content to the file
[program:laravel-worker]
process_name=%(program_name)s_%(process_num)02d
command=/usr/bin/php /home/your_linux_user/your_project_path/artisan queue:work --sleep=3 --tries=3 --timeout=60
autostart=true
autorestart=true
user=your_linux_user
numprocs=1
redirect_stderr=true
stdout_logfile=/home/your_linux_user/your_project_path/storage/logs/laravel-worker.log
Step 4: restart supervisor
sudo supervisorctl reread
sudo supervisorctl update
sudo supervisorctl start laravel-worker:*
Check the status:
sudo supervisorctl status
Step 5: Run the cron job on vps
Enter the following command to run the cron job on vps
sudo /usr/local/bin/php /home/your_linux_user/your_project_path/artisan schedule:run >/dev/null 2>&1
sudo crontab -e
Conclusion
Congratulations! You have successfully installed our Botivus on cPanel. You can now start building web applications with Botivus. If you have any questions, please contact our support team. 🚀